A Level NEA
During the second year of a two year A Level course, students are expected to develop a complex application or complete an investigation (OCR). One of the markers for a complex application is it uses a Graphical User Interface (GUI) rather than a text based interface. It certainly is a lot more complex when dealing with the myriad of different elements on a typical GUI design than dealing with keyboard input and outputting text to a console. Fortunately, a lot of the complexity can be ignored if you have a solid grasp of objects and inheritance. For most languages and platforms there are frameworks which can be used to build GUI based applications without having to write every line of code from scratch.
Applying Inheritance: JavaFX
One of the easiest ways to build a GUI based program in Java, is using JavaFX. This is a series of library packages that you can use to build an application. JavaFX applications inherit all the functionality of JavaFX through extending the Application class in the javafx.application package
import javafx.application.Application;

public class Main extends Application {
	...
}
The idea is that all the basics of the UI are inherited from the Application class within the javaFx.application library, to give a basic application that doesn’t really do anything but has a window, which can be moved, resized, minimised or closed just like every other GUI application. It’s the programmer’s job to add functionality to this basic application.
Activity 1
- Download IntelliJ Community Edition and install it on your machine
- Create a new project, choosing JavaFX as the type of project from the list on the left hand side of the screen. Click next.
- Give a name to your project and save it in a suitable folder.
- Check that the JavaFX libraries are available and install them if they are not (Java SDK8 to SDK10 should include them).
- Once the project has been created, click the small green triangle icon near the top right of the screen. This will build and run the project.
With luck (and no code written by you at all) you will have built a GUI based application!
If you have issues with the JavaFX install try reading the instructions here.
Visual UI builders
It’s possible to build an entire application by creating objects from classes within the JavaFX libraries, if you study all the classes and their methods. It’s much easier to do if you build your user interface by dragging and dropping the components of the interface on a visual layout within an IDE. This is possible in sophisticated IDEs like Netbeans, Eclipse or IntelliJ and an additional piece of software called scene builder. It may not be set up initially, but IntelliJ for example will ask you if you want to download and install it if it’s not already installed.
Layouts
One of the first decisions you will need to make is how the components of your UI will be arranged on the screen. This is such a common issue that most GUI frameworks provide layout containers to make the task more manageable.

The default layout for new JavaFX applications in IntelliJ is the grid pane layout. In this layout, a grid of squares arranged in rows and columns (which can span multiple rows or columns) is used to place user interface elements.

Activity 2
- In the project you created earlier, open the sample.fxml file, by clicking on its tab at the top of the screen, or selecting it from the src folder on the left hand side in the project view.
- View the FXML file in text mode not in Scene Builder. Inside the GridPane block, add the following lines exactly – note XML is case sensitive.
<Button text="Say hello world " onAction="#sayHelloWorld"/>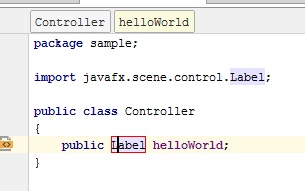
<Label GridPane.rowIndex="1" fx:id="helloWorld"/>- Click on helloWorld in the Label line
- Pressing Alt-Enter suggests a “quick fix” in IntelliJ to create a Label field called helloWorld. Click to accept, and it will switch to the Controller file and insert a line. Press enter to accept the line. Note that an import statement has been added above too.
- When done go back to the fxml file (the little icon in the left margin can do it)
- In the fxml file, click on sayhelloWorld in the <Button line
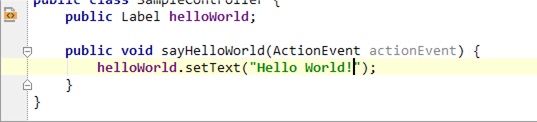
- Pressing Alt-Enter suggests a quick fix to create a method. Press enter to accept the line. Note that once again an import statement has been added above, this time for the ActionEvent class.
- Now add the code below into the sayHelloWorld method that was created for you. It changes the text property of the Label we have called helloWorld using a method called setText().
- Run the program (Shift-F10) and click the button for extreme excitement!
Recap
Take a moment to look back at what we did in activity 1 and 2 to get us to where we are so far, we:
- Created a skeleton application (IntelliJ did it for us)
- Created a button (in the FXML file)
- Created a label with no text (in the FXML file)
- Created an event listener (in the Controller file)
- Hooked up our event listener to some code that changes the label text (in the Controller file)
Have a look at the changes you made to the fxml file and the Controller.java file to get this far. See if you could figure out how to do this without using the autofix suggestions from IntelliJ.
Activity 3
- Open the fxml file again, and click on the Scene Builder tab.
- Click on the gridpane icon on the left hand side in the lower panel, right click and see if you can add an extra row
- Expand some of the nodes like the text label, change one property, for example the font or font size using the properties panel on the right hand size and see if you can notice the outcome on your program.
- Add another text label, one that displays (C) Your Name 2021 below where “Hello World” should appear
Activity 4
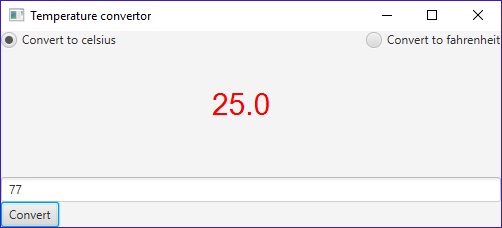
One of the first programs we wrote at the beginning of the course was a temperature convertor. Now try to build a GUI version of the same program. You can use the program from the previous activities to start from.
- Add a text box into which the input temperature is typed
- As the text is a string, it will need converting to a float/double before it can be used in a calculation.
- The conversion should happen when a button is clicked, you’ll need to add code to read the value from the text box, and then perform the calculation.
- The converted temperature is displayed in the middle of the screen
- Extension 1: change the colour of the text to red if the temperature is above 24 degrees C
- Extension 2: add an option to convert from fahrenheit or centigrade using a radio button
MVC Design pattern
The way that JavaFX apps are put together follows what is called an MVC design pattern. A design pattern is like a structure or architecture for a program. It turns out most programs fit into certain categories of problem. Rather than reinvent the wheel each time you create a new program, it may be that you use a design pattern to give you the bare bones of your system, and then flesh it out with your own custom code.
In the case of the MVC design pattern, a very common one used to develop desktop applications with a GUI, the model contains your own code and data specific to the application. The view is the UI code. The controller is the code that marries the two together. Clicks on the user interface result in the controller calling bits of code in the model. The key here is that there should be no UI code inside the Model. That way we separate concerns (good practice in software development) and also make our code more portable/usable in other projects.
In your temperature program, the conversion code should be in your own model class, the controller code will be in Controller.java, and the UI code will be in the fxml file. The Main.java class created by IntelliJ will kick the whole program off.
If it isn’t already, refactor (i.e. edit and rewrite) your code so there is a method or methods in the Model.java class that take a temperature and return a converted temperature. This code can then be called by Controller.java.
In a more complex program you may have a whole series of Controller classes dealing with different parts of the UI. The typical workflow for developing JavaFX programs would be:
- Work out the basic layout
- Place components within the layout
- Hook up elements to handling code ( methods that respond to ActionEvent)
- Use your handling code to read from and write to your internal model
- Update the display using the controller class
- Don’t worry too much about how it looks initially
- Once the basics are in place you can refine until you are done
Further exploration
https://dzone.com/refcardz/javafx-8-1
https://www.tutorialspoint.com/javafx/javafx_quick_guide.htm
http://code.makery.ch/library/javafx-8-tutorial/
https://www.baeldung.com/javafx
https://gamedevelopment.tutsplus.com/tutorials/introduction-to-javafx-for-game-development–cms-23835
https://docs.oracle.com/javase/8/scene-builder-2/get-started-tutorial/jfxsb-get_started.htm