When I started teaching my students the basics of JavaFX a few years back, IntelliJ made it really easy for a beginner to create the shell of a simple JavaFX desktop application with a few clicks of the mouse. For a combination of commercial and technical reasons JavaFX has been taken out of the Java SDK and placed into a separate module. IntelliJ’s slick creation of JavavFX projects has therefore become slightly “broken” as a result, and I suspect other IDEs too.
JDK
You will need to fix a few things before your JavaFX programs now work. If your school or college has a working install of BlueJ, it is likely to have the JavaFX libraries installed but IntelliJ won’t know anything about it and there are several places for it to be made aware.
Commonly, BlueJ is installed here:
C:\Program Files\BlueJThe first thing that IntelliJ will need telling for any project is where to find the JDK( Java Development Kit, which may be also be referred to as the SDK Software Development Kit). The one I have installed for BlueJ, version 11.0.10 works fine.
If asked for a JDK, choose
C:\Program Files\BlueJ\jdkIntelliJ may ask you if you want to install a JDK that contains JFX – you can click cancel so it doesn’t do that if you know you have BlueJ and the 11.0.10 or lower JDK (IntelliJ will ask you if you want to install an Open Source version of a current version of JavaFX rather than Oracle’s proprietary one).
Project folder
When selecting a folder for your projects, if your school/college supports it, make it on the local OneDrive of Google Drive. You may need to click the IntelliJ icon that looks like a PC and find it from there, but if not the folder is actually in the C drive under users then your login, then OneDrive – Name of School/College). This will save and compile locally but sync the files to your OneDrive so you can log onto any machine on your network. You could also then work on it at home.
I’d recommend you create a new subfolder in there for IntelliJ projects to keep everything seperate, and maybe another folder under that for your specific project.
JavaFX Compilation Errors
If you now try to build your empty new project, you will get a number of compilation errors like so:
java: package javafx.application does not exist
java: package javafx.scene does not exist
java: package javafx.stage does not exist
The errors are because the compiler cannot find the precompiled libary code for all the various JavaFX libraries. To fix this error:
Go to File>Project Structure on the main IntelliJ menu
Under Project Settings>Libraries you will see the Select library files dialog box
Click on the + icon and choose all the Javafx .jar files in the location where your JavaFX module is stored
(for example: C:\Program Files\BlueJ\jdk\lib\javafx\lib)

If you have done all this correctly, when you try to compile again, the compilation errors will disappear.
JavaFX Runtime
However, when IntelliJ tries to launch your program, you now get the error message:
Error: JavaFX runtime components are missing, and are required to run this applicationThis is because the Java launcher that is trying to run your Java program from inside the IDE cannot find the libary either! This time you need to go into the run/debug configuration settings for your project.
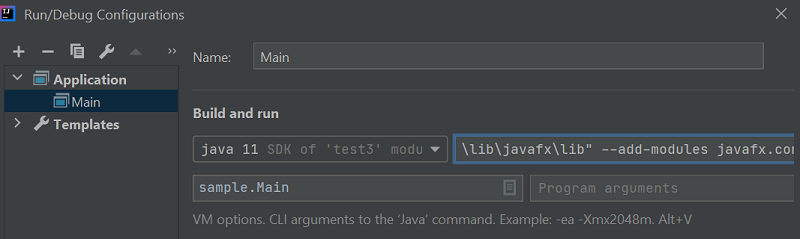
- Click on Edit configuration which is between the green hammer and play icons on the top toolbar.
- When the Run/Debug configurations dialog comes up, you need to locate the VM-options box.
- If it is not there, click the modify options link, and make sure there is a tick next to the “Add VM options” menu item. The VM options box should now appear in the Run/debug configurations window.
- Into the VM-options box box we need to add the following (all as one line):
--module-path "C:\Program Files\BlueJ\lib\javafx\lib" --add-modules javafx.controls,javafx.fxmlThis tells the Java virtual machine where to find JavaFX, and also which modules to load. Note the space between the two parts of this statement. The first part is the module file location, the second part is which modules you want to use. The two modules listed here are the most basic for the simple sample app created in IntelliJ. You will need to add modules in here if you want to use any other JavaFX features.
If you now try to run your JavaFX application it should launch without errors and produce the Hello World window that this default project is setup to produce.
If it still doesn’t work check you haven’t pasted the above line into the command line arguments box, remember it should be in the VM options box. I’ve done this several times myself! Also check the path is correct for your installation of JavaFX.
Scene builder
One final check is to open the sample.fxml file from the default project, and click the scene builder tab at the bottom of the window. If you don’t see the Scene builder menus to the left and right, you may see an error message at the top saying that Scene Builder is not installed. Click on the message and it will attempt to install Scene Builder.

You should now be set to develop JavaFX applications within IntelliJ
Summary
- Sometimes a beginner can be thwarted by errors that are nothing to do with their programming ability but are to do with the development environment.
- Java programs require an SDK or will not compile
- Since Java 8, JavaFX has been moved out of the core Java SDK into a separate module
- Even if the JavaFX files are present on the system, the IDE may know nothing about them so cannot successfully compile Java FX programs
- Once libraries are located, the program will compile
- The Java runtime environment also needs setting up or JavaFX programs will not launch
- This is done in the project settings, where virtual machine options need configuring
- The path to the JavaFX library needs to be specified and individual modules being used need to be listed